Fuel for the Soul

Nourish the Body, Nourish the Soul

Free Fitness Friday: Full Body Tabata Workout (20 minutes)

Fitness, WorkoutkellypuryearComment

Hooray! It's already Friday, it's already September, and it's already the half-way point of my first Dietetic Internship Rotation! Time sure is flying by, and while I do not feel that I have a lot of "free time" right now, I will always make time for a quick "Free Fitness Friday" work-out! Especially if it takes about 20 minutes to complete!

This week's Free Fitness Friday workout: Full Body Tabata (20 minutes): 

Rope slams never felt so good! (Photo compliments of DAPhotospot) 

Rope slams never felt so good! (Photo compliments of DAPhotospot

The workout is very simple and involves 4 dynamic exercises for a full body burn! As always, be sure to warm up for 3-5 minutes before starting the timer and cool down and stretch after you complete the last round!

1 Round:

1. Jump Rope

2. Bosu Ball Push-Ups

3. Bosu Ball Sit-Ups 

4. Rope Slams

Perform each exercise for 20 seconds, then rest 10 seconds before moving on to the next exercise. Rest for 1 minute between rounds and repeat for 5-6 rounds. 

Check out my demonstration video to see how each exercise is performed!

I can't wait to head to my gym after clinical tomorrow and kick the long-weekend off with this quick, calorie-blasting workout! 

Hope you will "join me" and I hope you have a wonderful long-weekend!

ย 

Meal made in Minutes: Turkey and Tomato Salsa (over brown rice and / or zoodles)

Nutrition, RecipekellypuryearComment

Sunday Funday this week consisted of catching up on laundry, fitting in a quick HIIT cardio session, and then spending the rest of the day working on Clinical assignments and meal prepping for the week. While Clinical Module assignments are NOT my favorite, preparing this week's Meal Made in Minutes brightened up my day and made my house smell delicious! 

The best part of meal prep today was that it only took me 15 minutes to make everything and I will have healthy options for lunch and dinner for the next 2-3 days! Now, that's a win-win situation! 

This week's Meal made in Minutes: Turkey and Tomato Salsa over brown rice and / or zoodles

Turkey and Tomato Salsa over Zoodles! It's what's for dinner!

Turkey and Tomato Salsa over Zoodles! It's what's for dinner!

Ingredients:

* Turkey and Tomato Salsa (serves 6)

  • 1.25 lb extra lean ground turkey
  • 1 16-oz jar of salsa
  • 1 28-oz can of No Salt Added Diced Tomatoes
  • 1 tsp cumin
  • 1 tsp chili powder
  • Grated Parmesan cheese (optional topping)
  • Red Chili flakes (optional topping)

* Brown Rice (serves 4-6)

  • 2 cups dry Minute Instant Whole Grain Brown rice

* Zoodles (serves 4-6)

  • 4-6 small zucchinis

ย 

Turkey and Tomato Salsa ingredients (minus the spices and toppings)

Turkey and Tomato Salsa ingredients (minus the spices and toppings)

Instructions:

  1. In a medium-sized pot, bring water to a boil and cook the Minute rice per package instructions. 
  2. While rice is cooking, cook the ground turkey in a large sauce pan (cook thoroughly until no pink is present, about 8-10 minutes).
  3. While the turkey is cooking, pour the salsa and diced tomatoes into a large pot and heat on medium heat.
  4. When the rice is done, remove the pot from the heat and fluff with a fork. When the turkey is done, turn off the heat and add in the cumin and chili powder (mix spices in well) and then add the cooked turkey to the large pot with the salsa and tomatoes (mix well and continue to heat on medium). 
  5. Clean and spiralize the zucchini.
  6. Remove the Turkey and Tomato Salsa from the heat and let cool.

ย 

Cooking in progress!

Cooking in progress!

Prepared single-serve portion of Zoodles for lunch tomorrow! Made possible by my amazing Kitchen Supreme Spiralizer!

Prepared single-serve portion of Zoodles for lunch tomorrow! Made possible by my amazing Kitchen Supreme Spiralizer!

And that's a wrap! A perfect assortment of nutrients in one complete meal made in under 15 minutes! I know I cannot wait to eat my Turkey and Tomato Salsa over brown rice AND zoodles tomorrow for lunch.... and then come home to leftovers for a quick on-the-spot dinner after a long day. 

Enjoy, my friends! Have a Happy Sunday and great week ahead!

Free Fitness Friday: AMRAP Kettle Bell Workout #2

Fitness, WorkoutkellypuryearComment

It's finally Friday and this week, more than ever, I am so happy it's the end of the work-week! With my first full week of my Dietetic Internship under my belt, I am ready for some R & R this weekend - after fitting in this quick and effective Kettle Bell workout of course!

Photo compliments of DA Photospot

Photo compliments of DA Photospot

This week's Free Fitness Friday features a calorie-blasting 30-minute Kettle Bell workout that you can do anytime and anywhere. This quick and convenient workout requires only 1 moderate-weight Kettle Bell and enough space for you to move around, jump, and swing the kettle bell. You want to be sure to use a moderate weight that you can lift 15-20 times for each exercise and to warm-up for 3-5 minutes prior to starting the workout. 

The concept of the workout is to complete As Many Rounds As Possible (A.K.A. "AMRAP") of the 5 different Kettle Bell exercises in 30 minutes, but to do so at a realistic pace so that you are able to continue the workout for 30 minutes.  I will complete this workout at Vitality Fitness and will most likely warm-up on the treadmill, but you can also walk / jog outside, ride a stationary bike, or warm-up on the rowing machine or elliptical.

So here it is! The 30-Minute AMRAP Kettle Bell Workout

1 Round:

  1. 20 X Kettle Bell Swing (full swing) *
  2. 20 x Kettle Bell Upright row *
  3. 10 x left leg forward lunge with Kettle Bell overhead press
  4. 10 x right leg forward lunge with Kettle Bell overhead press
  5. 10 x Squat Jump (holding Kettle Bell at chest height)

Repeat exercises for the next round(s) until the 30-minutes is up! Trust me, the time goes by quickly and the workout will be over before you know it!

* Here is a short video to demonstrate the first two exercises (Kettle Bell Swing and Kettle Bell Upright Row) in case you are not sure of how to perform these exercises.

Kettle bell swing followed by kettle bell upright row

(Note: I only performed 5 repetitions of each exercise for demonstration purposes, but aim for the designated number of reps for each exercise listed). If you still are not sure how to perform one of the exercises, please feel free to ask me in the comments below!

And that is it, my friends! A very quick (and sweaty) workout for you to blast some calories before the weekend arrives... now it's time to work out and then veg out! 

Have a great Friday and wonderful weekend ahead!


Meal made in minutes: Nut Butter Chocolate Chip Protein Bars

Recipe, Nutritionkellypuryear1 Comment

I would like to welcome you to my BRAND NEW WEBSITE for Fuel for the Soul, LLC, and I couldn't think of a better way to introduce my new website than to share these Nut Butter Chocolate Chip Protein Bars with you! The best part is that these bars can be made in minutes, do not require baking, and licking the spoon after you are done is highly recommended!

It has been about two weeks since my last recipe post, but I have been busy preparing for my Dietetic Internship (which starts tomorrow morning) and perfecting these tasty protein bars (which I will be eating throughout my first week "on the job" at DaVita Dialysis). 

This week's Meal made in minutes: Nut Butter Chocolate Chip Protein Bars

Bars are set in the baking dish and ready for refrigeration! 

Bars are set in the baking dish and ready for refrigeration! 

Ingredients: (16 squares)

  • 1 cup plain Rolled Oats (Certified Gluten-free Oats if needed)
  • 2 scoops Vanilla protein powder (whey protein or vegan / plant protein)
  • 1 tsp ground cinnamon
  • 1/2 cup natural nut butter (any nut butter will do)
  • 1/3 cup maple syrup (or agave or honey)
  • 1/2 cup unsweetened non-dairy milk (almond milk, cashew milk, coconut milk...)
  • 1 tsp pure vanilla extract (or almond extract)
  • 1/4 cup dark chocolate chips
All the ingredients needed for the protein bars (Silk Unsweetened Almond Milk not pictured)

All the ingredients needed for the protein bars (Silk Unsweetened Almond Milk not pictured)

Instructions: 

  1. In a large mixing bowl, combine all dry ingredients (oats, protein powder, and cinnamon) and mix well with a large spoon.  
  2. Add in the nut butter, maple syrup, vanilla extract, and non-dairy milk (in that order) to the dry ingredients and mix well. You may have to use some elbow grease to mix all ingredients until thoroughly combined (dough will be sticky).  
  3. Add in the chocolate chips and fold into the dough mixture. 
  4. Lightly spray an 8X8 baking dish with olive oil spray and pour dough mixture into the bottom of the dish. Use the back of the spoon (or your hands) to flatten the dough evenly to cover the entire dish. (Then you can lick the spoon or eat the dough right off your finger tips!)
  5. Cover dish with aluminum foil and place in the refrigerator for 30-60 minutes to set. After dough has set, cut into 16 even bars and enjoy!

** You can wrap each bar in plastic wrap and store in the refrigerator for up to one week. 

The mixture will form a sticky dough (similar to cookie dough, but try to refrain from eating it straight from the bowl!

The mixture will form a sticky dough (similar to cookie dough, but try to refrain from eating it straight from the bowl!

Grab a bar (or TWO) before you head out the door for the day for easy on-the-go transport to fuel you throughout the day. Whether you are at work, running errands, or about to work out, these bars are perfect fuel to give you the energy you need to take on any challenge you may face!

There you have it, friends! Hope you enjoy making and eating these delicious protein bars! Remember to come back to www.fuel4soul.com for more easy and healthy recipes, quick and effective workouts, and all around fitness and nutrition tips to help you achieve the healthy lifestyle you deserve! 

Meal made in minutes: Maple Blueberry Overnight Oats

RecipekellypuryearComment

It's already Sunday again! This week really flew by... actually, this whole summer really flew by, and today I am preparing for my trip to NC for Orientation Week at Lenoir-Ryhne University! I am excited for my Dietetic Internship program to start, but I am also very anxious and nervous for the next big step in my journey to becoming a Registered Dietitian. Luckily, I have a long list of "to-do's" today before I leave tomorrow to keep me preoccupied and distracted. One of the most important things on my "to-do" list is to make overnight oats for my husband to eat for breakfast all week while I am gone! I am sure you have heard of overnight oats by now, but if you haven't gotten around to making them then you are missing out! Overnight oats are incredibly easy to make, a delicious way to start your day, and can be made in minutes! I make a couple batches at a time for my husband to eat for breakfast when he is short on time (which is all the time) and have experimented with several different ingredients. After a few trail and error attempts, I have found the perfect recipe for the BEST overnight oats - and today I am going to share it with you!

This week's Meal Made in Minutes: Maple Blueberry Overnight Oats

Maple Blueberry Oats (5)

Ingredients:

  • 1/3 cup rolled oats (Gluten-Free if needed) (I use Bob's Red Mill Gluten-Free Rolled Oats)
  • 1/2 cup milk (Dairy-Free if needed) (I use 1% milk for my hubby and Unsweetened Vanilla Almond milk for me)
  • 1/4th cup plain Greek yogurt (I use Fage or Oikos) or 2 tbsp vegan protein powder (I use Bio Chem Vegan Vanilla Bean)
  • 1-2 tbsp Maple syrup (to desired sweetness)
  • 1-2 tbsp Chia seeds (to desired thickness)
  • 1/3 cup fresh blueberries
Maple Blueberry Oats ingredients

(Ingredients for 4 jars of Maple Blueberry Overnight Oats and 1 jar of Gluten-Free & Vegan Maple PB Protein Overnight Oats)

Directions:

  1. Place oats, milk, yogurt / protein powder, and maple syrup (in that order) into a mason jar or deep Tupperware container (with a lid). Mix all ingredients well with a spoon.
  2. Add in the Chia seeds and mix well again.
  3. Add in the blueberries and mix well again.
  4. Top with the lid (air-tight) and store in the refrigerator for at least 4 hours or overnight for best results.
  5. Remove from the refrigerator when ready to eat and enjoy as-is (straight from the jar) or warm up your oats in the microwave for 30-60 seconds.

** You can add any toppings of your choice to your oats :-) Some of my favorite toppings are banana slices, almond slices, PB2, and cinnamon.

Maple Blueberry Oats (2)

(Step 1: before the ingredients are mixed well)

Maple Blueberry Oats (3)

(Step 2: with the Chia seeds mixed in)

Maple Blueberry Oats (4)

(Step 3: before the blueberries are mixed in)

It really is that simple and SO delicious! You can make the overnight oats in less than 5 minutes and have your breakfast ready to grab-and-go the next morning!

You can play around with the ingredients a little, but be sure to have more liquid than oats (since the oats will absorb the milk and expand) and increase the liquid even more if you add more Chia seeds (since the seeds will also absorb the milk and expand even more)!

Maple PB Protein Oats

(My Gluten-Free & Vegan version: Maple PB Protein Overnight Oats - with GF oats, almond milk, Vegan protein powder, PB2, maple syrup and Chia seeds!)

Have fun experimenting with your Overnight Oats and enjoy a delicious and satisfying breakfast made in minutes :-)

Meal Makeover: Eggplant Turkey Boats

RecipekellypuryearComment

The realization that my summer vacation is coming to an end has officially sent in and I find myself daydreaming about my trip home last week. My favorite part of being home was spending time with my family and cooking in the kitchen with my mom. My mother has become quite the cook these days and, with the help of my creative healthy twists on recipes, she and I made the perfect team. We invited my grandparents, my aunt, and my younger cousin over for dinner the night before I flew back to Tampa and we had quite the task of feeding seven people with seven different "particular tastes".... so I figured that would be a perfect night to try out a new recipe!

This week's Meal Makeover: Eggplant Turkey Boats

Eggplant plated
Eggplant plated

The best part is that the main ingredients were as "farm-to-table" as we could get - we used the vegetables straight from mother's garden and she felt quite proud of herself!

Ingredients: Serves 6-8 

  • 2 lbs extra-lean ground turkey
  • 4 medium eggplants
  • 6-8 medium zucchini / yellow squash (1 per person)
  • 2 16-oz jars of low-sodium marinara / pasta sauce
  • 1.5 - 2 cups part-skim mozzarella cheese (shredded) (1/4th cup per eggplant half)
  • 2 tsp chili powder
  • 2 tsp cumin
  • Black pepper (to taste)

Tools needed:

  1. Large skillet / sauce pan
  2. Spiralizer / Veggetti

Instructions:

  1. Preheat oven to 400 deg. F.
  2. Wash the eggplant and zucchini / squash. Cut the ends off each vegetable and set aside the zucchini / squash. Cut the eggplant in half (length wise) and carve out the seeds / flesh with a spoon, leaving 1/2 the flesh remaining in the shell for the "boat" - Note: be careful not to carve too deep / crack the shell of the eggplant! Set the seeds / flesh aside.
  3. Spray 2-3 baking dishes with olive oil spray (to prevent sticking) and place each eggplant half on the baking sheet, flesh side up. Spray the flesh of the eggplant with olive oil spray to prevent burning when baking. Bake eggplant in the oven for 10-15 minutes - Note: be sure to watch the flesh of the eggplant and remove them from the oven if they start to burn!
  4. While the eggplants are baking, cook the ground turkey in a large sauce pan (no pink remaining) and add in the cumin, chili powder, and black pepper. Turn the heat down to simmer / low and add in the eggplant seeds / flesh and one jar of the marina sauce. Cook for an additional 2-3 minutes (just to soften the eggplant and heat the sauce). Stir as needed.
  5. When the eggplants are done, remove from the oven and carefully fill each eggplant shell half with the ground turkey mix and top each with 1/4th cup shredded cheese.
  6. Reduce oven temperature to 350 deg. F and place the eggplants back into the oven for 5-10 minutes (just until the cheese has melted).
  7. While the cheese is melting, spiralize each zucchini / squash onto a serving dish (1 per person).
  8. Pour the remaining jar of sauce into a microwave-safe bowl and heat for 1-2 minutes (stopping the time and stirring the sauce at the 1-minute mark) and spoon some sauce on top of the spiralized zucchini / squash.
  9. Remove the eggplants from the oven and place one eggplant "boat" on top of the zucchini / squash noodles and serve! Note: use tongs to transfer the eggplant to each plate!
Eggplant prep
Eggplant prep

(Eggplant "boats" carved out and ready to bake!)

Eggplant Turkey Filling

(Cooked ground turkey with spices and sauce)

Eggplant filled
Eggplant filled

(Eggplant "boats" stuffed with turkey & eggplant mix and topped with cheese)

Eggplant done
Eggplant done

(Eggplant "boats" baked and ready to eat!)

Zoodles
Zoodles

(All the zucchini and yellow squash spiralized into "noodles")

Eggplant plated
Eggplant plated

(One plated Eggplant Turkey Boat over a bed of zoodles!)

Now doesn't that look delicious!? The good news is that this dish was as delicious as it looks and my whole family was impressed - even my 21-year-old male cousin in college loved it!

The whole meal was prepared and served within 45 minutes (and consumed within 15 minutes!!) and kept us happy and full all night! Do yourself a favor and serve this meal at your next family dinner - trust me, you won't regret it :-)

Free Fitness Friday: At-Home AMRAP Kettle Bell Workout

Fitnesskellypuryear1 Comment
Kettle Bell home workout

It's finally Friday! And it's a bitter-sweet one for me since my vacation home is over and I am already missing my family and friends back home in Massachusetts! I had such a nice time back in my home town and truly enjoyed the quality time spent with my loved ones, relaxing at home, and my awesome at-home workouts! Speaking of which, today's Free Fitness Friday features a calorie-blasting 30-minute kettle bell workout that you can do anytime and anywhere. 
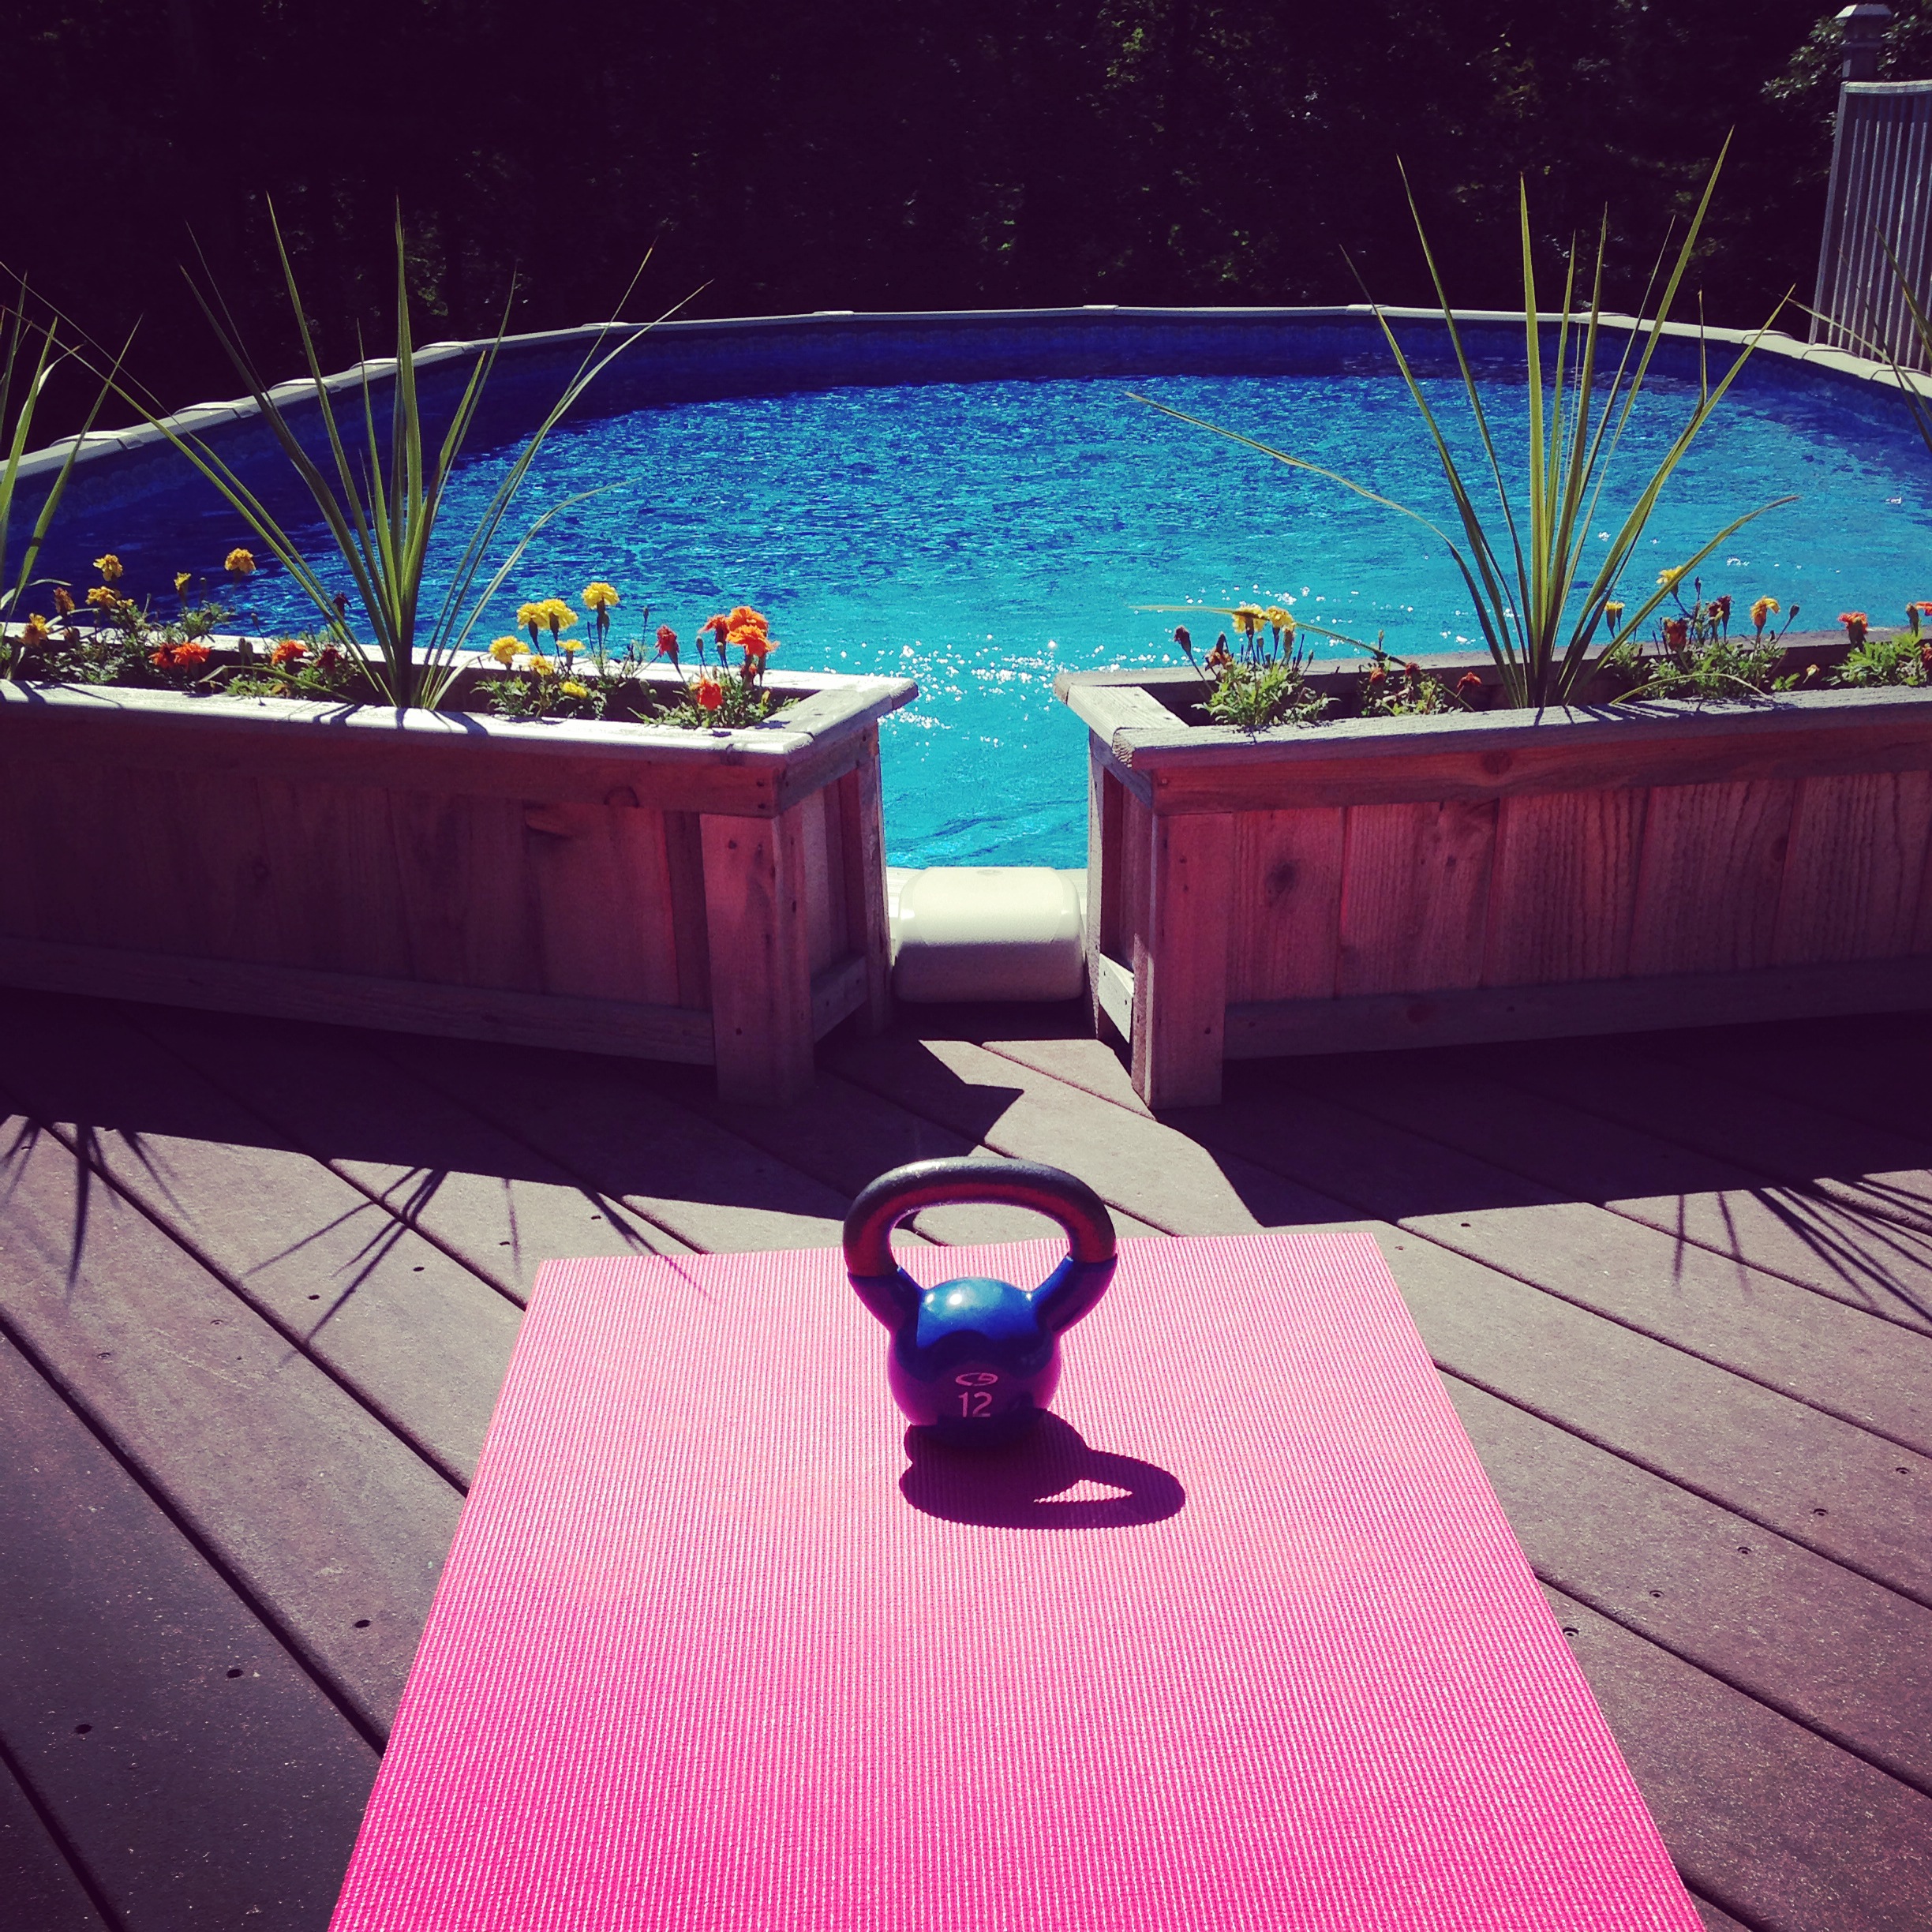
This quick and convenient workout requires only 1 moderate-weight Kettle Bell (or a moderate-weight dumbbell), an exercise mat (or towel), and (ideally) a 200-yard distance (for the "cardio" portion). You want to be sure to use a moderate weight that you can lift 10-12 times for each exercise and you can choose any form of "cardio" exercise that you prefer and have access to (walking / jogging, marching in place, stationary bike, rowing machine, elliptical, jump rope...).

The concept of the workout is to complete As Many Rounds As Possible (A.K.A. "AMRAP") of the 7 different exercises in 30 minutes, but to do so at a realistic pace so that you are able to continue the workout for 30 minutes. You want to set up your Kettle Bell / dumbbell and exercise mat on flat ground before starting the clock and select a good location with enough space for you to perform the exercises. I completed my workout outside on my parents' driveway in the shade and had about a 200-yard distance to run up and down the street for the "cardio" portion.

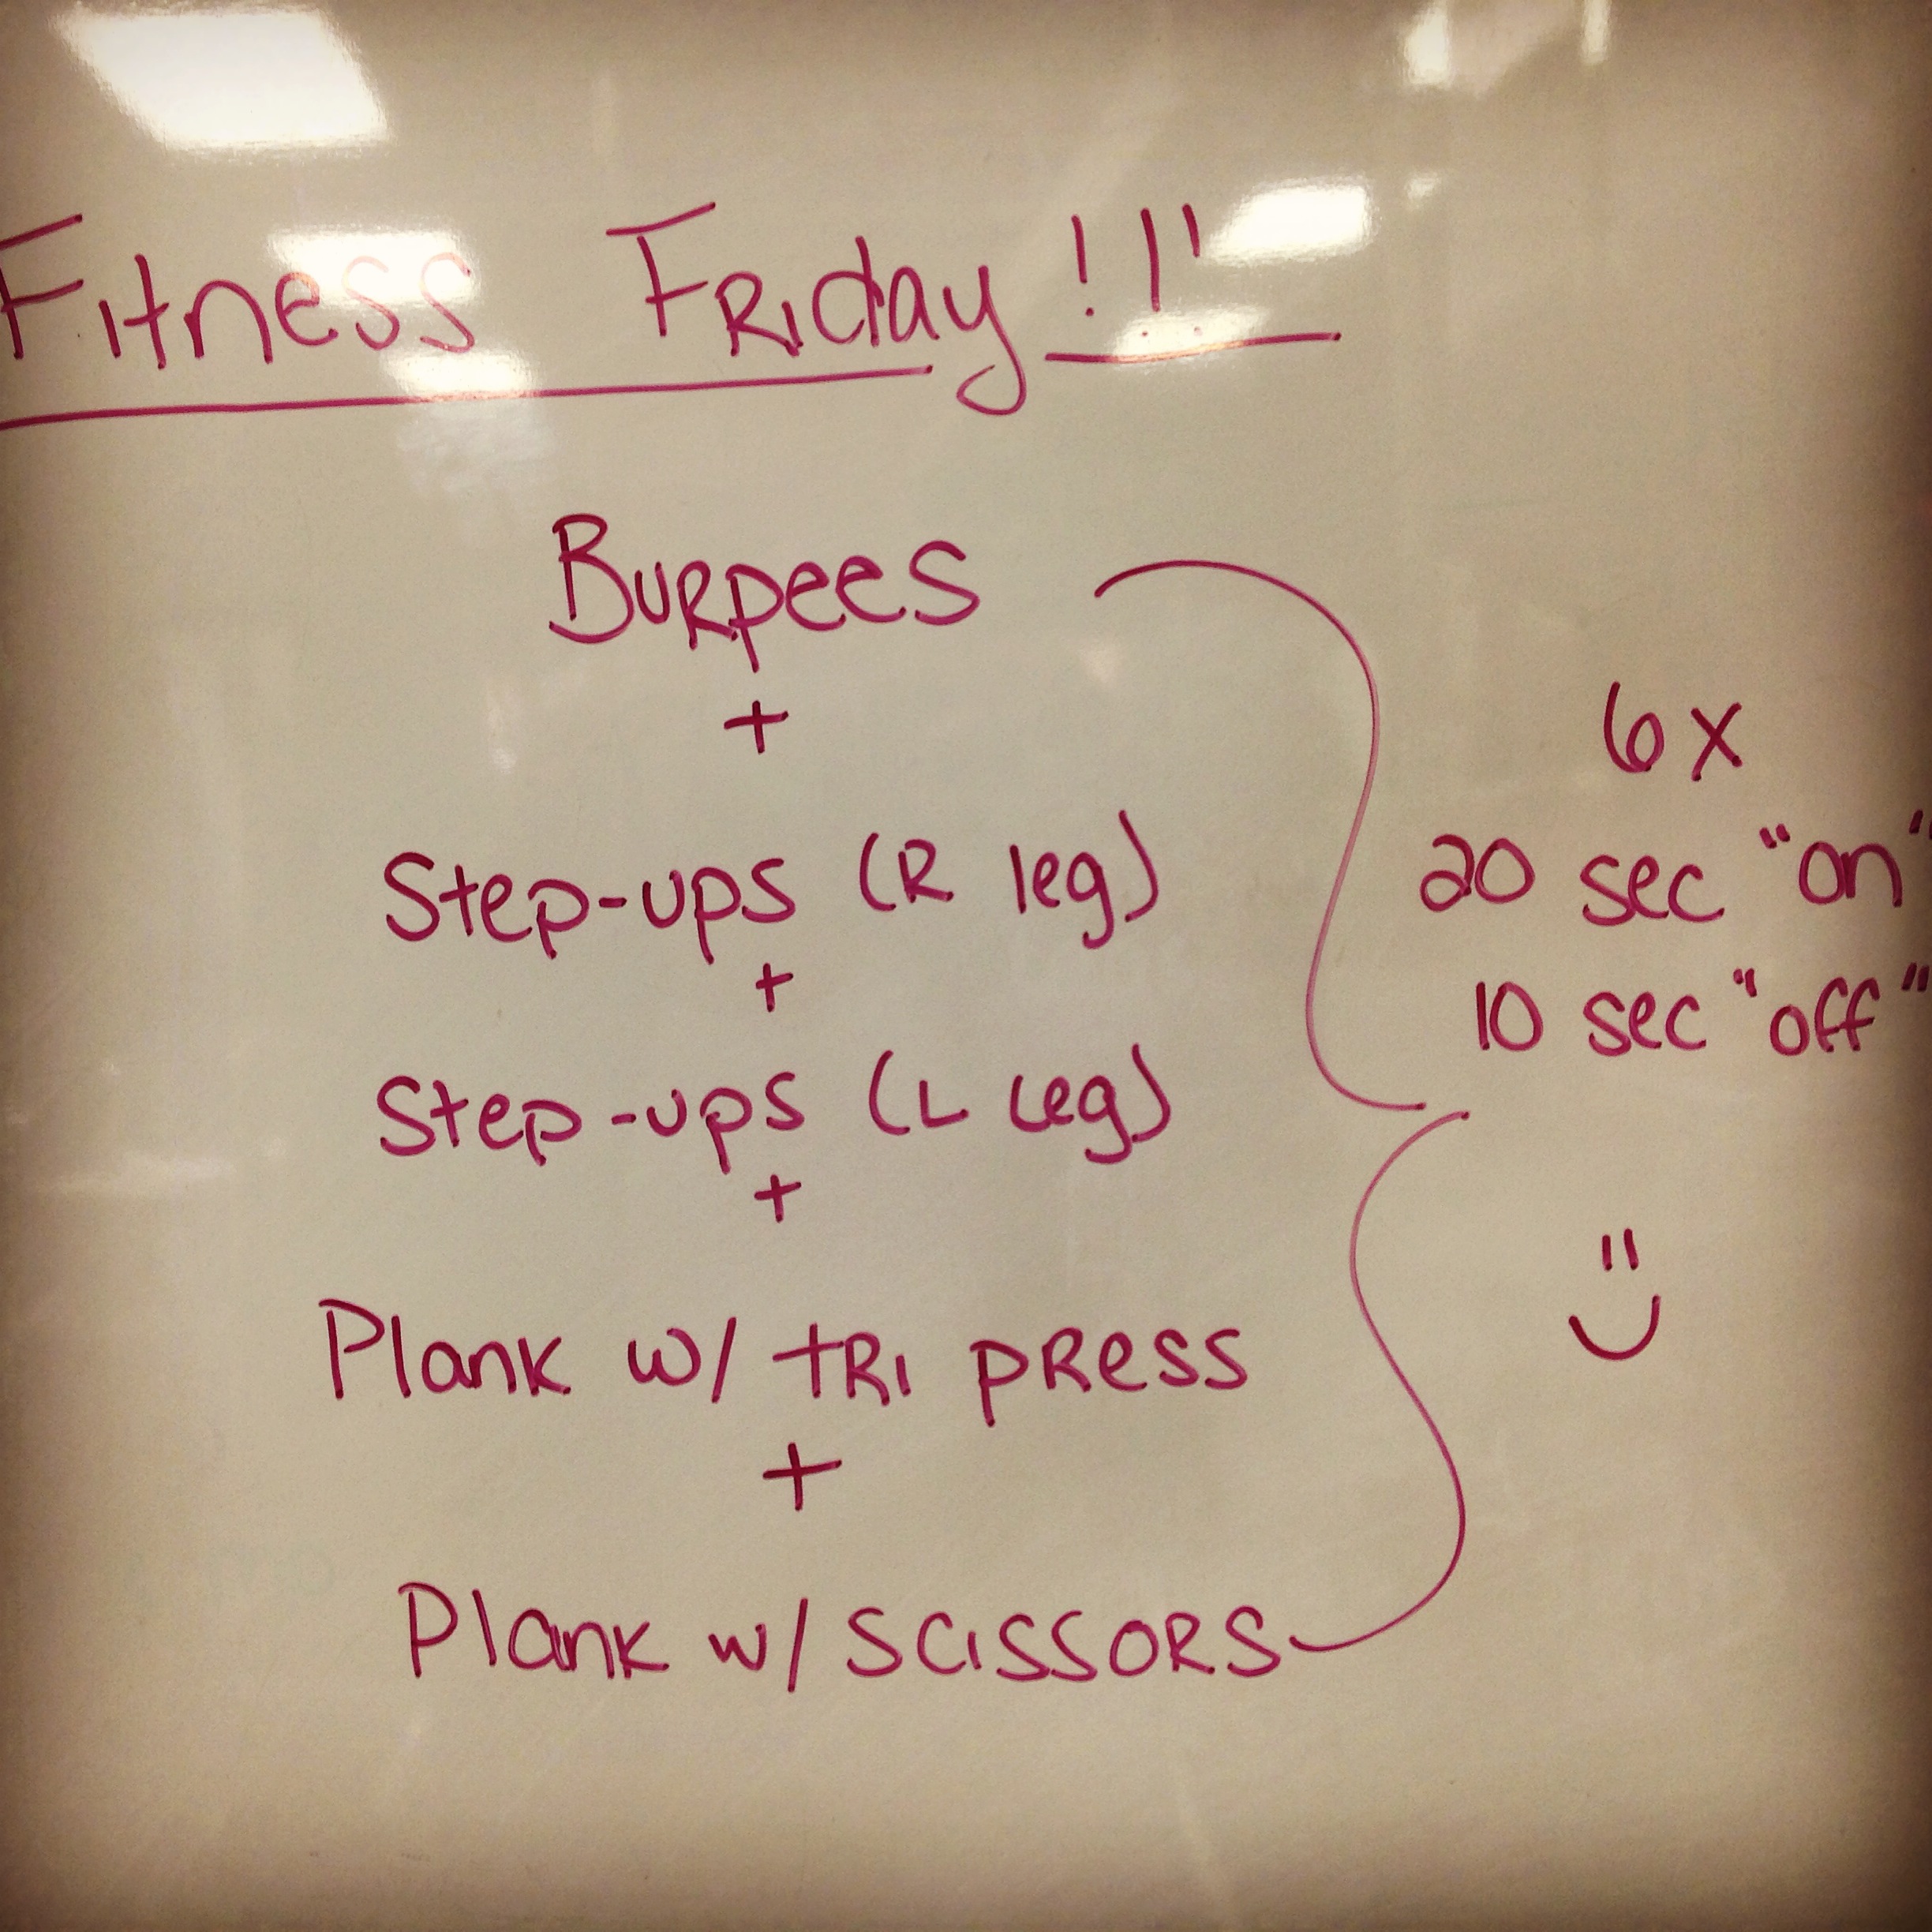
So here it is! The 30-Minute At-Home AMRAP Kettle Bell Workout

1 Round:

  1. 2-minute cardio (walk / run 200- yards out and 200-yards back, jump-rope, bike, row...)
  2. 10 x Right arm Kettle Bell swing
  3. 10 x Left arm Kettle Bell swing
  4. 10 x Squat with right arm high pull
  5. 10 x Squat with left arm high pull
  6. 10 x Kettle Bell tricep push-ups (can be performed on knees if needed)
  7. 15 x Kettle Bell sit-ups with straight arms

Repeat exercises for the next round(s) until the 30-minutes is up! Trust me, the time goes by quickly and the workout will be over before you know it!

Here is a short video to demonstrate each exercise (minus the 2-minute run) in case you are not sure of how to perform each exercise. (Note: I only performed 3 repetitions of each exercise (#2-#7) for demonstration purposes, but aim for the designated number of reps for each exercise listed). If you still are not sure how to perform one of the exercises, please feel free to ask me in the comments below!

[embed]https://www.youtube.com/watch?v=nRWXpnkqXRM[/embed]

Have a great workout and weekend ahead :-)

Thirsty Thursday: Mamma Chia and Vanilla Smoothie

Recipekellypuryear1 Comment
Ned's Point
Ned's Point

One of my favorite things about being back in my home town (Mattapoisett, MA) is being able to run down to one of the most beautiful ocean-side parks called Ned's Point. Ned's Point is about 1.25 miles from my parents' house and most of the route is covered by huge, beautiful oak trees and surrounded by large beach houses. There is something about Ned's Point that makes me feel "at home" and sitting on the picnic tables and gazing past the lighthouse at the crashing waves against the rocks brings back childhood memories - it is truly my happy place :-)

(Ned's Point - Mattapoisett, MA - My "happy place")

I've started nearly every morning since I arrived back home with a nice jog down to Ned's Point and back to my parents' house and, while it is only 2.5 miles round trip, the "hazy hot and humid" temperatures this week have gotten the best of me and I could not wait to guzzle down an ice-cold smoothie as soon as I walked in the house! There is nothing quite as refreshing as an ice-cold post-workout protein smoothie and my food-shopping-savvy mother has introduced me to some great new smoothie ingredients that led me to create this week's Thirsty Thursday smoothie recipe - Mamma Chia Vanilla Protein Smoothie.

Chia smoothie 1
Chia smoothie 1

With only three main ingredients, this smoothie is by far the easiest one to make and easily the most delicious post-workout smoothie yet!

Ingredients:

  • 8 oz unsweetened vanilla almond milk
  • 3.5-oz Mamma Chia Squeeze Vitality Snack packet
  • 1 scoop (single-serve packet) of vanilla vegan protein powder
  • 5-6 ice cubes
  • Natural sweetener of choice (to taste, optional) - I used 1 Stevia packet
  • Optional add-ins: 1/4th cup plain Greek yogurt (for more protein, carbohydrates, and creamier texture), 1/4th cup dry oats (for more complex carbohydrates, B vitamin, and thicker consistency), or 1/2 frozen banana (for more carbohydrates, potassium, and more slushy-like consistency).

* I usually travel with a packet or two of protein powder (just in case) and I am a big fan of NutraKey VPro, which is made of organic, non-GMO raw plant proteins and provides all the essential amino acids the body needs.

* My brilliant mother found the Mamma Chia snack packs at BJ's Wholesale Market (similar to Costco or Sam's Club) and these tasty little snack packs provide 1200 mg of Omega-3s and can be purchased in bulk for healthy snacking on-the-go!

Chia smoothie 2
Chia smoothie 2

Instructions:

  1. Pour almond milk into a blender with the ice cubes.
  2. Squeeze the Chia snack pack into the blender and blend on high for 30-60 seconds.
  3. Add in the scoop /packet of protein powder (and sweetener if desired) and blend on high again for 30-60 seconds (or until all ingredients are mixed well and the ice cubes are all broken up.
  4. And chug away (but not so quickly that you get brain freeze)!!

There you have it! A very easy way to combine simple ingredients with essential nutrients to refuel after a workout or hot run in the summer heat! Stay cool and refuel with lean protein and healthy fats :-)

Meal made in minutes: Turkey Wraps

RecipekellypuryearComment

Happy Sunday! And yes, this Sunday is a very happy one since I am still visiting my family in Massachusetts and soaking up every last bit of vacation! The funny thing is that even though I am on vacation and relaxing, I still have a very busy schedule filled with morning workouts, lunch and dinner dates with friends, and spending quality time with my family. Take yesterday, for example - My parents and I made a last-minute decision to go out on the boat for a few hours (before going to the annual Portuguese Feast and then visiting with family friends) and I had less than 10 minutes to pack a lunch... thankfully I had my go-to quick lunch essentials in their kitchen and I made some delicious Turkey Wraps and packed some raw veggies and guacamole to create a quick, well-balanced meal in minutes.

This week's Meal Made in Minutes: Turkey Wraps

Turkey lettuce wraps 2

*Note: this particular lunch was not taken on the boat, but it was made at my parent's house the last time I was home and it depicts the perfect turkey wrap ensemble (for your viewing pleasure).

Ingredients:

  • 4-6 slices No Salt-Added (NSA) all-natural / organic Turkey Breast (3-4 oz)
  • 1 small cucumber (washed, peeled, and sliced)
  • 1 single-serve Guacamole packet
  • 1/2 cup grape or cherry tomatoes

Instructions:

  1. Lay out the turkey slices and spread about 1 tbsp of the guacamole on top.
  2. Peel the skin and slice the cucumber lengthwise into 4-6 slices (about 1/4th-in thick). Leave the rest of the cucumber half intact (or slice into thicker pieces) and put in a separate plastic bag or wrap in plastic wrap.
  3. Wrap each turkey, guacamole, and cucumber combination up in plastic wrap  (like a roll) and place them all in larger plastic bag for easy transportation.
  4. Place the tomatoes in a separate plastic bag.
  5. Save the rest of the guacamole for dipping. Either cover the container with aluminum foil or put the remaining guacamole in a small Tupperware container for easy transportation.
  6. Place all items in a small cooler with a couple ice packs and you are all set! (I also packed a couple waters and homemade trail mix of raw nuts and seeds as a snack for later!)

*Note, you can mix and match any items in this meal to meet your preferences - swap the turkey breast for sliced chicken breast (all-natural / organic) or Tempeh / firm tofu (for a vegan / vegetarian option), swap the cucumber for raw zucchini slices or sliced bell pepper, and swap the tomatoes for baby carrots. You can also wrap your turkey wraps in large Bibb lettuce leaves / kale leaves (for a gluten-free, low carbohydrate option) or wrap them in small whole-grain tortillas (for an extra dose of complex carbohydrates and longer-lasting energy). You can also mix the guacamole with some plain Greek yogurt to add more protein and creaminess to your meal (see picture below).

Turkey lettuce wraps 1

(Same meal, different ingredients: baby carrots and plain Greek yogurt)

And there you have it - a quick and delicious meal with lean protein, healthy fats, and colorful vegetables to fuel you for the day ahead! The best part is that you can make this meal in minutes and take it on the road with you wherever your plans may take you :-)

Free Fitness Friday: Interval Workout #2

FitnesskellypuryearComment
Treadmill Interval Workout #2

So here we are again friends, it's finally Friday! And this Friday I am heading home to visit my family for one last vacation before my dietetic internship starts on August 24th! I am so excited to spend quality time with my family and have been busy getting everything ready for my trip (washing clothes and cleaning the house, packing for the week ahead, and setting up my client schedule for the week while I am away). With all I had to get done before my flight later today, I still made time to squeeze in a quick cardio workout and (though I only ran 3 miles on the treadmill) I burned nearly double the calories of a steady-pace 3-mile run and I was completely exhausted after just 25 minutes on the treadmill!

How is this possible? As I mentioned in last week's Free Fitness Friday: Intervals for the Win, you can still get the health benefits of cardiovascular exercise in a quick 25- minute workout when you incorporate Interval Training - and you will burn twice as many calories with Interval Training over the same distance run in a shorter amount of time!

Today's workout was less complex than last week's interval workout and my 3 miles were up before I knew it! So here it is!

The 25-minute Interval Workout #2: Escalated Miles

Distance (in miles)

Speed (in mph)

RPE (based on chart)

0-0.25 miles

6.0-6.5

4-5

0.25-0.50 miles

6.5-7.0

6-7

0.50-0.75 miles

7.0-7.5

7-8

0.75-1.0 miles

7.5-8.0

9

1.0-1.25 miles

6.0-6.5

4-5

1.25-1.50 miles

6.5-7.0

6-7

1.50-1.75 miles

7.0-7.5

7-8

1.75-2.0 miles

7.5-8.0

9

2.0-2.25 miles

6.0-6.5

4-5

2.25-2.50 miles

6.5-7.0

6-7

2.50-2.75 miles

7.0-7.5

7-8

2.75-3.0 miles

7.5-8.0

9

  1. Start with a 2-3 minute warm-up walk / jog on the treadmill to warm up your body and prepare your muscles for the intense work ahead.
  2. After you feel nice and warmed up, set the speed of the treadmill to a 6.0-6.5 mph speed (depending on your fitness level) and an RPE of a 4-5 "moderate activity" factor (based on the RPE chart) and run 1/4th of a mile (0.25 miles).
  3. Once you hit the 0.25 mile mark, increase the speed by 0.5 mph (up to 6.5-7.0 mph) and an RPE of 6-7. Once you hit the half mile mark, increase the speed again by 0.5 mph (7.0-7.5 mph) and an RPE of 7-8. For the last quarter of the mile, increase the speed again by 0.5 mph (7.5-8.0 mph) and an RPE of 9 ("very hard" activity factor) and hold this pace until you hit the mile mark (1.0 miles).
  4. Once you hit the 1 mile mark, reduce the speed back down to 6.0-6.5 mph and an RPE of 4-5 for the next quarter of a mile. Repeat the pattern in step 3 to increase the speed by 0.5 mph at each 0.25 mile increment until you complete the 3 miles.
  5. Reduce the speed to a comfortable walk ' jog for a 2-3 minute cool-down.
  6. You're done!

You can refer to the RPE chart to set your starting and ending pace on the treadmill and be sure to set the speed based on you OWN PERSONAL rate of perceived exertion! Remember, this workout is for you and YOU alone - work hard, but be sure to set a realistic pace so you will be able to successfully compete the 3-mile interval run :-)

RPE chart
RPE chart

(Photo: runandbehappy)

And there you have it, friends! A quick 3-mile interval run that you can complete in 25 minutes or less and enjoy the rest of your Friday and the weekend ahead! I know I will :-)

Thirsty Thursday: Super Green Matcha Tea Smoothie Bowl

Recipekellypuryear2 Comments

It's Thursday again! I don't know about you, but I am tired of all this rain we have been having in Tampa lately and I needed some brightness in my life today. The bad news is it looks like there's a 60-80% chance of rain for the next five days, but the good news is you can easily make this Super Green Matcha Tea smoothie bowl to brighten your day and load up on protein and antioxidants! I made this smoothie bowl for a power-packed post-workout lunch, but you can have this smoothie bowl whenever you need a pick-me-up meal!

Super Green Matcha Tea Smoothie Bowl

(Took advantage of the break in the rain storm to enjoy my smoothie bowl outside :-) At least my grass is green thanks to the rain!)

Ingredients:

  • 6 oz unsweetened iced green tea (I ordered mine from Starbucks on my way home from the gym, but you can brew your own green tea and chill it in the fridge for 30 minutes or so).
  • 4 oz frozen banana
  • 1 oz avocado (about 1/4th of an avocado, sliced)
  • 1-2 cups baby spinach
  • 1 scoop vegan protein powder (vanilla flavored is recommended)
  • 2 t Organic Matcha Green Tea powder
  • 1 packet Stevia (or more to taste)
  • 4-5 ice cubes
  • 3 tbsp KIND cinnamon oat with flaxseeds granola (for topping)
  • about 10 fresh blueberries (for topping)
Green tea smoothis ingredients

Instructions:

  1. Pour iced green tea into a blender and add the frozen banana, avocado slices, and spinach leaves. Blend ingredients for about 30 seconds to mix well.
  2. Add in the protein powder, Matcha powder, Stevia, and ice cubes. Blend ingredients for about 60 seconds to mix well. You may need to scrape down the sides of the blender with a spoon or spatula and blend again to ensure all ingredients are mixed well and there are no clumps.
  3. Pour smoothie mixture into a large, wide-mouthed bowl and top with granola and blueberries.
  4. Devour smoothie bowl :-)

That's it! Simple as that and you have a super, power-packed Green Tea Smoothie bowl that will fill you up and leave you feeling rejuvenated and ready to take on the day (come rain or come shine)!

Green tea smoothie nutrition

Not to mention, this smoothie bowl provides you with nearly 190% of your daily calcium requirements and nearly 740mg of potassium; 30g of lean protein, 8g of fiber, and only 10g of fat; and doesn't break the calorie bank with around 350 calories total!

So go ahead, brighten your day with this Super Green Smoothie! I know it worked for me :-)

Green tea smoothis inside

(I enjoyed my smoothie bowl with a good read, thanks to Strong magazine!)

Meal Makeover: Zucchini Pizza Boats

Nutrition, RecipekellypuryearComment

I had a lot of "me time" this past weekend (since my sweet husband was busy working at the office Saturday and Sunday) so I took advantage of my free time and tested out some new recipes! Not only did I have a blast making a mess of my kitchen, but I was able to play around with three new recipes and could not wait to share this week's meal makeover recipe with you all! If you are like me (and human) you may crave pizza nearly 365 days a year, but you may not want the high-carbohydrate and high-calorie content of the traditional pizza! Have no fear, the Zucchini Pizza Boat has come to your rescue!

This week's Meal Makeover: Zucchini Pizza Boat

Zucchini pizza complete
Zucchini pizza nutrition

This low-carb, high protein "pizza" is super easy to make and surprisingly delicious and filling (thanks to the water and fiber content of the almighty zucchini)! One serving (1 zucchini boat) provides you with nearly 36g of lean protein and a mere 13g carbohydrates and 6g total fat at only 245 calories.

The best part is that you can modify the ingredients to make this meal for yourself or for the whole family to enjoy and you can use any type of lean protein that you prefer (extra-lean ground turkey, chopped chicken breast, shrimp, tofu...)! I made this meal for my neighbor and myself with extra-lean ground turkey and used the leftover turkey in my meals for the next two days. (Meal-prepping at its finest!)

Ingredients: 2 servings (2 Zucchini Boats)

  • 6 oz cooked extra-lean ground turkey (divided) (I cooked 1.25 lbs of Jennie-O Extra-lean Turkey and saved the rest for leftovers).
  • 1 large zucchini (divided) (I found a very large, wide diameter zucchini that weighed about 12 oz)
  • 1/2 cup pizza sauce (divided) (look for low-sodium, all-natural varieties or make your own)
  • 1/2 cup 2% milk shredded mozzarella cheese (divided)
  • 1 tsp cumin
  • 1 tsp chili powder
  • 1 tsp garlic salt

Intructions:

  1. Preheat oven to 400 deg. F. Wash the zucchini well and dry with a paper towel before cutting the vegetable in half (length wise). Cut the ends off as well. Carefully scoop out the zucchini flesh and seeds with a mini ice cream scoop or spoon, but be careful not to press too hard and break the core of the zucchini. You want to leave about 1/4th of the zucchini flesh intact to make the "boat" shape for the turkey filling. Discard the zucchini flesh and seeds or save for later use in another recipe.
  2. In a large sauce pan, cook the turkey completely (no pink pieces left) and then add in the spices (cumin, chili powder, and garlic salt), remove from heat and stir in spices well.
  3. Line a cookie sheet with aluminum foil and place the zucchini halves on top of the foil (flesh side up). Fill each boat with 2 tbsp pizza sauce, then 2 tbsp shredded cheese, then 3 oz of cooked turkey, followed by remaining 2 tbsp pizza sauce.
  4. Bake the zucchini boats at 400 deg. F for 20 minutes. Carefully remove the cookie sheet from the oven and top each boat with the remaining 2 tbsp shredded cheese.
  5. Reduce the oven temperature to 350 deg. F and return the cookie sheet back to the oven and bake for an addition 5-10 minutes (or until cheese is completely melted). Keep a close eye on the cheese so that it does not burn (like mine did in the picture above)! ...ooops....
Zucchini pizza prep
Zucchini pizza prep

(Cooked turkey with spices and hollowed-out zucchini boats)

Zucchini pizza filling

(Filled boats with pizza sauce and shredded cheese)

Zucchini pizza full
Zucchini pizza full

(Filled boats with ground turkey and shredded cheese)

And that's it! We paired our zucchini boats with a mixed greens salad for a well-balanced and nutritious meal. I enjoyed every last bite of my zucchini pizza boat and the great company of my sweet neighbor, Margie :-)

I hope you will try out this meal makeover recipe and share it with your family or friends. Let me know what you think!

Fuel for the Long Run

Fitness, Nutritionkellypuryear2 Comments
long-run-meal.jpg
Pre-race Race Shirt
Pre-race Race Shirt

Part of my transformation into a โ€œlong-distance runnerโ€ was learning how to properly fuel my body before a long training run or on race day and how to refuel afterwards. The food you eat prior to a long run will significantly affect your performance and the food you eat after a long run will significantly affect your recovery and muscle mass overtime. After several trial and error attempts with pre-run and post-run meals, I was able to get my fuel and refueling down to a science and identify the most important aspects of fueling for the long run. Whether you are just starting out with long-distance running or are an avid runner, following these guidelines and tips will help you train and complete your first distance race or give you the competitive edge to get that PR you are working so hard to achieve.

(The night before my 2nd Women's Half, carb-loaded & ready to run!)

Pre-long-run: The main focus should be on consuming sufficient carbohydrates before a long run, since carbohydrates are the main source of energy during physical activity. According to the National Academy of Sports Medicine (NASM)

Strenuous exercise of all intensities makes great demands on the bodyโ€™s carbohydrate stores and glycogen depletion will lead to fatigue. Because glycogen stores are limited, and because they provide a critical contribution to both anaerobic and aerobic energy production, one important objective of sports nutrition is to protect glycogen and enhance access to fat for long duration, moderate intensity activity"

and they recommend a relatively high daily carbohydrate (CHO) intake (> 6 g/kg/d) and CHO ingestion (30-60 g/h) prior to, and during, exercise in order to delay the onset of fatigue and increase long-distance performance.

For this reason, it is very important to consume a small meal or snack with a high concentration of carbohydrates prior to a long training run or race. These smaller meals or โ€œsnacksโ€ should be consumed 30-120 minutes before a long run or race (depending on the size and contents of the meal and how hungry you feel as well as the duration of activity). These meals should be low in fat and fiber (for quicker, easier digestion), moderate in protein (10-20g), and moderate-to-high carbohydrates (30-60g easily digestible carbohydrates) for sufficient energy and optimal performance.

Examples:

  • Power Oats (closer to 90 - 120 minutes beforehand due to higher fiber content)- ยฝ cup cooked plain oatmeal topped with half a banana and 1 tsp agave or honey
  • Eggs and toast โ€“ 2 slices whole grain bread with 1-2 eggs (hard boiled, scrambled, over easyโ€ฆ)
  • Banana toast โ€“ 1 whole grain bagel, English muffin, or 1/2 a Lavash wrap topped with 1 tbsp natural nut butter and ยฝ banana (sliced)
  • โ€œLast resortโ€ options= A โ€œcleanโ€ energy bar (like RXBar, Lara Bars, or GoMacro Bars) or homemade energy bars (click here for awesome energy bars you can make yourself!)
pre run meal
pre run meal

(My favorite pre-run meal: 1/2 a Lavash wrap with PB2 and banana slices)

Post-long-run: These meals should be consumed within 1 hour of exercise and the size and contents of the meal depend on the intensity and duration of the run. These meals are necessary to replenish the glycogen (energy) stores that were used up during the run and should consist of a 3:1 carbohydrate โ€“to-protein ratio (3g of carbs for every 1g of protein) and low-to-moderate in fat. The carbohydrates are also important for more efficient delivery of protein to the damaged muscle tissue. As previously mentioned, low fat and fiber is important for quicker digestion and delivery of nutrients to the muscle tissue. The โ€œwindow of opportunityโ€ to replenish glycogen stores and rebuild skeletal muscle tissue is approximately 30-60 minutes following exercise, therefore it is important to consume this post-run meal within 1 hour of exercise.

Examples:

  • Peanut butter and banana sandwich โ€“ 2 slices whole grain bread, 2 tbsp natural peanut butter, and ยฝ banana (slices)
  • Veggie omelet and whole grain English muffin (breakfast)โ€“ 1 toasted whole grain English muffin (with 1 tbsp real fruit jam, optional) with a 1 egg + 2 egg white omelet with sautรฉed vegetables (spinach, tomatoes, mushroomsโ€ฆ)
  • Chicken and rice bowl (lunch) โ€“ 4 oz white chicken breast and sautรฉed vegetables over ยฝ cup โ€“ 1 cup brown rice (or Quinoa!)
  • Tuna salad wrap (lunch) โ€“ 4 oz chunk light tuna (in water) mixed with 1 tsp mustard and 2 tbsp plain Greek yogurt, wrapped in a small whole grain tortilla / pita with tomato slices and spinach
  • Homemade โ€œreal foodโ€ protein shakes

Protein Shake ideas: Liquids are digested more quickly than solid foods, so post-workout shakes are an extremely effective way to deliver carbohydrates and protein to muscle tissue within the โ€œwindow of opportunityโ€ โ€“ especially when whole foods cannot be consumed within an hour of exercise.

  • Chocolate milk shake โ€“ Blend 8 oz reduced-fat chocolate milk with 1 small banana and ice!
  • Green Monster shake - Blend 2 cups spinach, ยฝ cup plain Greek yogurt, 8 oz unsweetened non-dairy milk, 1 banana, and 1 tablespoon peanut butter with ice
  • Power Oats Shake โ€“ Blend 8 oz fat-free milk, 1 scoop protein powder, 1 cup frozen berries, 1 tbsp flaxseeds or chia seeds, and ยผ cup dry plain oats with ice
  • Search through my Thirsty Thursday Smoothie recipes for more ideas on how to make the perfect post-workout smoothie!
post run meal
post run meal

(My favorite post-run meal: Egg white omelet (with tomatoes, spinach, & avocado slices) with a side of dry Gluten-Free toast and fruit)

See!? Fueling and refueling are extremely important for long-distance running performance and can be a fun and delicious way to treat your body right :-)

Meal made in minutes: Easy egg white sandwich

Nutrition, RecipekellypuryearComment

Eggs are a very versatile lean protein and can really be eaten anytime of the day - breakfast, lunch, or dinner! This power-house of a super-food is nutrient dense, yet low in calories and contains several essential vitamins (B vitamins and vitamin A and vitamin D) and minerals (choline, selenium, and phosphorus) as well as the highest quality protein and amino acid profile that meets the needs of the human body. The whites alone contain only 16 calories (per large egg) and 4g of protein, without the saturated fat or cholesterol that is found in the yellow yolk. The best part is that egg whites can be prepared in minutes and easily incorporated into a perfect sandwich for a quick breakfast before work. Heck, you can even make this meal portable and eat it on your way into work (while driving as safely as possible, of course!)...

Quick Egg white sandwich

This week's Meal Made in Minutes: Easy Egg White Sandwich  

Ingredients:

  • 1/2 cup liquid egg whites (I used All Whites) or the egg whites of 3 large eggs
  • 2 slices whole grain bread (I used Canyon Ranch 7-Grain gluten-free bread)
  • 1 slice reduced-fat provolone cheese (I used Sargento)
  • 1 cup baby spinach leaves
  • 2 tbsp hummus (any flavor) (I used Tribe Sun-dried Tomato)
  • Cherry tomatoes (optional)
  • Black pepper or red chili flakes (to taste)

Tools needed:

  1. Toaster oven
  2. Microwaveable omelet maker (I bought mine at Amazon.com)
Egg white omelet
Egg white omelet

(All Whites egg whites with red chili flakes)

Directions:

  1. Toast bread in toaster oven
  2. While bread is toasting, prepare omelet - pour egg whites into omelet maker and season with black pepper or red chili flakes (to taste).
  3. Cook eggs in the microwave on high heat for 1 minute. Make sure whites are complete set and cooked through - if whites are still runny, place omelet maker back in the microwave for 15 seconds.
  4. Assemble egg white sandwich - spread 1 tbsp hummus on one slice of bread, then lay 1/2 cup spinach on top, then the egg whites, provolone cheese, remaining 1/2 cup spinach and the second slice of bread with remaining 1 tbsp hummus spread on top.

Viola! That's it, within 6-8 minutes you will have the perfect egg white breakfast sandwich! To take your breakfast to-go, wrap the sandwich in aluminum foil and hit the road!

This breakfast sandwich will beat any fast-food option and will fill you up with complex carbs, healthy fats, and lean protein to get you through the busy morning :-)

Feel free to play around with the ingredients. Some substitutions you can try:

  • 1 egg + 2 whites instead of all whites
  • 1/4th avocado (mashed or sliced) instead of hummus
  • kale instead of spinach
  • a whole-grain tortilla wrap instead of bread

Enjoy!

Free Fitness Friday: Intervals for the Win!

FitnesskellypuryearComment

Itโ€™s finally Friday!! Once again, the week flew by and we are already approaching the weekend! I truly donโ€™t know where the time goes, but I know how important it is to make the time to exercise โ€“ even when I am short on time! Time really is of the essence and it may be difficult to fit in a cardio workout throughout the week, but I have great news for you! You can still get the health benefits of cardiovascular exercise in a quick 25- minute workout when you incorporate Interval Training - and you will burn twice as many calories with Interval Training in the same amount of time! Now thatโ€™s a win, win situation if you ask me!

Interval Cardio
Interval Cardio

(Photo: BodyBuilding.com)

The beauty of Intervals is that you can perform any cardiovascular exercise that you wish in nearly any setting that you desireโ€“ walking, jogging, sprinting or running the stairs outdoors; walking, jogging, and sprinting on the treadmill inside; or on the stair-master, rowing machine, elliptical, or spin bike in your house or gym โ€“ and you are able to perform the exercise at a higher intensity throughout the 25-minute workout. The key is performing the exercise at intervals of low intensity (to rest and recover) and higher intensity (to get your heart-rate up and torch some serious calories).

RPE chart
RPE chart

The intensity of the exercise is based on YOUR OWN rate of perceived exertion (RPE) and it is important to rest and recover during the lower intensity and to really push it during the higher intensity intervals. Here is a table that lists and describes the RPE method for setting the intensity level for your intervals.

(Photo: runandbehappy)

Use this chart when setting your intensity levels throughout the interval workout and be sure to warm up for the first 3 minutes at a โ€œlight activityโ€ factor (2-3 on the RPE scale) in order to warm up the body and prepare yourself for the higher intensity work. Similarly, be sure to cool down during the last few minutes at a โ€œlight activity factorโ€ (2-3 on the RPE scale) in order to allow your heart-rate to come back down to near resting levels and end your work out with a full body stretching session to reduce soreness and prevent injuries.

Hereโ€™s the workout! Itโ€™s only 25 minutes long (including the warm-up and cool-down) and it will be over before you know it! Trust me, you will feel the burn and will feel amazing when itโ€™s over!

Time

Intensity (RPE)

0:00-3:00

2-3 (warm-up)

3:00-5:00

7-8

5:00-7:00

4

7:00-9:00

7-8

9:00-11:00

4

11:00-13:00

9

13:00-15:00

4

15:00-17:00

7-8

17:00-19:00

4

19:00-21:00

10 (as fast as you can!)

21:00-25:00

2-3 (cool-down)

Now that you understand how to use the RPE chart and have the Interval Training workout in front of you, letโ€™s get this workout started!

  1. Pick your cardiovascular exercise of choice
  2. Set your Ipod to your favorite workout playlist
  3. Set your first interval speed and get going!

Have a blast โ€œblastingโ€ some serious calories and have a wonderful weekend ahead!

Thirsty Thursday: Easy Green & Lean Smoothie

Nutrition, Recipekellypuryear3 Comments

There is nothing more refreshing than an ice-cold smoothie after a hard workout and there's no faster method of re-fueling post-workout than by drinking a protein-packed, antioxidant-rich "Green & Lean" smoothie! I am often asked how I make my post-workout smoothies and many clients have asked me "what are the best ingredients to put into your smoothies to replenish the body's carbohydrate stores and provide sufficient protein for muscle tissue repair and growth?" These are great questions and today I am going to answer these questions and provide you all with my recipes for an Easy Green & Lean Smoothie!

Green Matcha Smoothie

Now doesn't that Green Smoothie look beautiful! This delicious smoothie was made at Village Health Market in South Tampa and, while it was packed with antioxidants, lean protein, and did not contain any added sugars, it cost me more than $6!! Now I don't know about you, but I can't justify paying a lot of money for something that I could easily make at home for less than half the price... so I decided to use this smoothie as inspiration for my homemade versions.

The main ingredients in this particular Green Smoothie are:

  • Unsweetened Almond Milk
  • Banana
  • Spinach
  • Vegan vanilla bean protein powder
  • Matcha Green Tea powder
  • 1 Stevia packet
  • Ice cubes

See how simple it would be to buy these ingredients and make several smoothies at home! The important ingredients to include are a liquid of choice (water, unsweetened non-dairy milk or low-fat milk, and even leftover coffee or cold brew coffee), fruit (banana, berries, pineapple, peaches, mango...), super green leafy vegetables (spinach or kale), lean protein source (whey protein powder, vegan protein powder, Greek yogurt, or egg white protein), extra antioxidant boost (Match powder, Maca powder, raw cocoa powder...), a natural sweetener of choice (Stevia / Truvia, maple syrup, agave, or honey), and ice cubes to blend to desired consistency. You can add in or remove any ingredients that you'd like and you can mix match until you find your favorite blends! It really can be fun to experiment with your homemade smoothies!

Here are a few of my favorite concoctions to give you some ideas :-)

Smoothie ingredients - coffee

PB and Banana Mocha Smoothie:

  • 1 cup chilled black coffee with 1/4th cup unsweetened vanilla almond milk
  • 1 small banana
  • 2 cups baby spinach
  • 1/2 cup liquid egg whites (10g protein)
  • 2 tbsp PB2
  • 1 tsp Matcha Green Tea powder
  • 1 packet Stevia
  • 5 ice cubes
Smoothie ingredients - designer whey

Spinach and Banana Smoothie:

  • 1 cup unsweetened vanilla almond milk
  • 1/2 banana
  • 2 cups baby spinach
  • 1 scoop 100% whey protein powder (vanilla) (22g protein)
  • 1 tsp Matcha Green Tea powder
  • 2 packets Truvia
  • 5 ice cubes
Smoothie ingredients - Greek yogurt

Greek PB and Banana Smoothie:

  • 1 cup unsweetened vanilla almond milk
  • 1/2 banana
  • 2 cups baby spinach
  • 1 single-serve Oikos plain Greek yogurt (15g protein)
  • 2 tbsp PB2
  • 1 packet Stevia
  • 5 ice cubes

Mix all ingredients together in a blender and voila - you have the perfect post-workout smoothie that will replenish and rejuvenate :-) Have fun mixing and matching the ingredients and coming up with your own favorite smoothies!

Stay tuned for more great Smoothie recipes every Thursday!

Meal Makeover: Shrimp and Avocado Pesto "Pasta"

Recipekellypuryear3 Comments

There is nothing more comforting to me than a big ol' plate of pasta, but there are few meals more calorically dense or higher in carbohydrates! One of my favorite meals is shrimp and spaghetti with pesto sauce and Parmesan cheese, but this meal can contain upwards of 1,000 - 1,300 calories and leaves me feeling bloated, sluggish, and curled up on the couch in the fetal position (thanks GLUTEN)! This terrible combination lead me to search for a recipe for a healthier version of my beloved Pesto Pasta that would provide me with the right combination of nutrients to leave me feeling energized and still give me that "comfort food" feel I so desperately miss. After a few trial and errors with different recipes, I decided to make my own version of a Pesto Pasta that is higher in protein, healthy fats, and antioxidants and lower in calories, saturated fat, and empty carbohydrates. I was quite surprised with the end result and could not believe how delicious my concoction was... not to mention it is naturally gluten-free, contains 2-3 servings of vegetables, and is surprisingly filling!

Let me introduce to you....

Shrimp and Avocado Pesto "Pasta"

Shrimp Pesto Zoodle Pasta

The big secret is I used zucchini and yellow squash for the "pasta" (also known as "zoodles") and avocado and spinach in the pesto sauce! I promise you won't miss the spaghetti and your taste buds will be blown away by the avocado pesto sauce!

So what are you waiting for!? Give this made-over recipe a try!

Ingredients: (Makes 4 servings)

* Avocado Pesto Sauce (About 30 calories per 2 tbsp - serving)

  • 1/2 small Haas Avocado
  • 3 tbsp fresh squeezed lemon juice (1/2 a lemon)
  • 2 cups baby spinach leaves (stems removed)
  • 10 Basil leaves (stems removed)

* Shrimp & Zoodles 

  • Olive oil spray
  • Old bay spice (to taste)
  • 12 oz pre-cooked, frozen shrimp (thawed)
  • 2-3 medium zucchinis
  • 2-3 medium yellow squash
  • 1 cup grape tomatoes
  • 1/2 cup reduced-fat Parmesan cheese (for topping)
  • Red Chili flakes (to taste)

* Tools needed:

Instructions:

  1. Combine all the ingredients for the Avocado Spinach Pesto in a food processor and blend until well combined. You may need to scrape down the sides of the bowl periodically and add a tbsp or two of water to reach desired consistency. Once the pesto reaches your desired consistency and taste, set aside in the refrigerator while you prepare the shrimp and zoodles.
  2. Use a vegetable spiralizer or mandolin slicer to turn your zucchini and yellow squash into vegetable noodles. Once all vegetables are spiralized, set aside.
  3. Spray a large skillet / sauce pan with olive oil spray and saute the shrimp with the Old Bay (to taste) until the shrimp are heated through (about 2 minutes). Add the spiralized zucchini and yellow squash and heat for another 1-2 minutes until the vegetables are heated through and soften up a bit.
  4. Remove the skillet from the heat and add the avocado pesto sauce. Mix well!
  5. Divide the shrimp and zoodles among 4 plates and top each plate with 1/4 cup grape tomatoes, 2 tbsp Parmesan cheese, and chili flakes (to taste).
Shrimp & Zoodles
Shrimp & Zoodles

(Sauteing the Shrimp and Zoodles with Old Bay :-) )

And that's all there is to it! A quick and VERY healthy meal the whole family will love, without the carb-overload and bloating! You can switch up the ingredients to your liking and be creative with your very own concoctions! Some of my favorite versions of this Pesto Pasta include grilled chicken and ground turkey with canned diced tomatoes!

Grilled chicken zoodles

(Grilled chicken breast with "Pesto Pasta")

Turkey zoodles
Turkey zoodles

(Ground turkey with "Pasta" Marinara)

Go ahead, have fun with your Pesto Pasta! You can thank me later :-)

Bon appetit!

Meal made in minutes: Chicken & Brown Rice Bowl

Nutrition, Recipekellypuryear1 Comment

I love Sundays! For many, it is a day to rest and recover from the busy week; to spend time with family and friends; and a day to enjoy some "me time." But for some, it is a day that is full of honey-do lists and endless errands; full of catching up on the list of things you left un-done from the previous week; and a day spent trying to get ahead of the game at home or at the office. For me, Sundays consist of a little bit of both - spending time with my husband and in-laws mixed in with endless chores around the house, running errands, and prepping for the week ahead. The day passes by so quickly and before I know it, it's nearing 9:00 pm and I still need to prepare my meals for the next few days. When I am short on time (which happens more often than not) my go-to meal is some variation of a Brown Rice Bowl - a super easy way to combine your favorite foods in one bowl to take to work with you for lunch or to have ready when you come home for dinner. On the menu for this Monday is one of my favorite bowls - the Chicken and Brown Rice Bowl - full of lean protein, healthy fats, complex carbohydrates, and colorful vegetables!

chicken bowl
chicken bowl

This meal (inspired by one of our favorite South Tampa restaurants, Ciccio's) is not only super easy to make, but it is loaded with nutrients and long-lasting energy! All you have to do is a little prep work the night before and you will have a meal made in minutes that will be sure to satisfy :-)

Ingredients:

  • 1/2 cup brown rice
  • 1-2 cups mixed greens
  • 4 oz cooked chicken breast meat (from a rotisserie chicken or grilled chicken breast)
  • 1/4 cup guacamole (1 single-serve guacamole packet)
  • 1-2 tbsp balsamic & olive oil dressing

Directions:

  1. Boil or steam brown rice (as instructed) I used Minute Rice and boiled 1 cup of rice for 5 minutes. I saved the rest for leftovers.
  2. While rice is cooking, remove (4 oz) chicken breast and chop into smaller pieces. I used a rotisserie chicken, but grilled or baked chicken breast is fine too). 
  3. Once rice is cooked and cooled, place 1/2 cup into a Tupperware bowl and top with mixed greens, and chopped chicken breast.
  4. Add guacamole and dressing right before serving and enjoy!

I typically eat this quick meal for lunch and take the Tupperware with me on-the-go. I recommend waiting to add the guacamole and dressing until you are ready to eat to prevent the greens from getting soggy and the guacamole from turning brown.

This is such a quick and versatile meal! You can really use any lean protein and any other vegetable your heart desires for this bowl, you just need to do a little planning and prepping the night before!

Here are some variations of the Rice Bowl for substitution ideas and inspiration:

Chicken buritto bowl
Chicken green bean bowl

(Chicken Burrito Bowl: with brown rice, spinach, grilled chicken breast, grape tomatoes, salsa, avocado, and 1 hard-boiled egg) 

(Lighter Chicken Bowl: with mixed greens, steamed green beans, grilled chicken breast, grape tomatoes, and balsamic dressing)

Here are some tips for the planning and prepping:

  • Buy a rotisserie chicken from the grocery store when you do your weekly food shopping or bake a couple chicken breasts on Sunday evening for the beginning of the week.
  • Use Minute brown rice, steam-able rice bags for the microwave, or boil a batch of rice on Sundays to use as leftovers for the next few days.
  • Look for single-serve guacamole packets (such as Wholly Guacamole)  and pour your salad dressing in small Tupperware container for on-the-go convenience.

Bon appetit!

Free Fitness Friday: Workout #2

FitnesskellypuryearComment

Happy Friday!! I don't know about you, but this week seemed to drag on and on and I was running around like a chicken with my head cut off all week! Well, it's finally Friday and time to squeeze in this week's FREE  workout! I was short on time this morning, but had an absolute blast (and blasted some serious calories) with this quick 20 minute HIIT / Tabata workout. I played around with some recordings of each exercise to demonstrate how they are done, but I am still working out the issues with editing and sharing videos! Bear with me as I learn the ropes of editing media, but at least you click the YouTube links and be able to see how each exercise is done and ensure that you have proper form!

Here we go!

Workout #2
Workout #2

As always, you want to start with 5-10 minutes of an easy warm-up and finish the workout with at least a 5-minute cool-down and stretch! The whole workout takes 20 minutes (30-45 minutes total with the warm-up and cool-down) and you'll be surprised with how much fun you'll have while burning some serious calories!

Complete each exercise (1-5) for 20 seconds of high-intensity work ("on") with a 10-second rest ("off") between each exercise until you complete the 5th exercise - that is one (Tabata) cycle. For example, do the burpees (with the jump) for 20 seconds, rest for 10 seconds, then move onto the right leg step-ups for 20 seconds, rest for 10 seconds, then move onto the left leg step-ups for 20 seconds, rest for 10 seconds, then move onto the plank with tricep press for 20 seconds, rest for 20 seconds, then finish with the plank with scissor jumps for 20 seconds. Rest 10 more seconds before moving onto the next cycle. Repeat the cycle 5 more times (for a total of 6 cycles) and then cool down for another 5-10 minutes (depending on how much time you have). You can choose any form of cardiovascular exercise to cool down, but don't skimp out on the cool- down! It's important to allow your heart-rate to come back down to near-resting levels AND stretch after a high-intensity workout!

Here are the YouTube links for demonstration purposes. The first video is me performing the burpee exercise, the second video is me performing the right leg step-ups and the left leg step-ups, and the third video is me performing the plank with tricep press and the plank with scissor jumps.

Video 1: Burpees

http://www.youtube.com/watch?v=7_XlWjJq_RQ

Video 2:  Right leg step-ups and the left leg step-ups

Video 3: Plank with tricep press and the plank with scissor jumps

Have a blast (while blasting calories) and have a wonderful weekend ahead!

Thirsty Thursday: Mocha-cado Smoothie Bowl

Recipekellypuryear3 Comments

Introducing my "Thirsty Thursday" recipe where I will share my smoothie of the week with you! I usually whip up a quick protein shake when I am in a rush after a morning workout, but today I took my time and planned out my FIRST EVER smoothie bowl concoction - The Mocha-cado Smoothie Bowl (I know, super clever of me, huh?) Smoothie bowls are all the new rage, but what is so special about being able to actually eat your smoothie with a spoon? I decided to find out and, boy, was I impressed!

Smothie bowl edited
Smothie bowl edited

(Mocha-cado Smoothie Bowl)

Ingredients:

  • 6 oz coffee (cooled to room temperature or chilled in the fridge)
  • 1/3 cup unsweetened almond milk (I used Silk unsweetened vanilla)
  • 1/2 frozen banana (2 oz)
  • 1 handful baby spinach
  • 1/5th avocado (about 1.8 oz)
  • 1/2 single-serve plain Greek yogurt (I used Oikos)
  • 1 packet (full scoop) NutraKey Vegan Protein Powder: Mochaccino)
  • 4-5 ice cubes (to blend to preferred texture)
  • 3 tbsp KIND Cinnamon Oat with Flaxseeds granola (for topping)
Smoothie ingredients

Instructions:

  1. Mix coffee with almond milk and pour into a blender
  2. Add the frozen banana, spinach, avocado, and Greek yogurt and blend (about 30 seconds). You may need to scrape down the sides of the blender to make room for the next ingredients and to make sure it all blends evenly!
  3. Add the protein powder and ice cubes and blend for 30-60 seconds. You may need to add more almond milk or ice cubes to reach your desired consistency (smoothie should be VERY thick!)
  4. Pour the smoothie into a wide-mouthed  bowl and use a spoon to scrape out any remaining smoothie from the blender (trust me, you'll want to eat every last drop... and maybe lick the blender bottle too...)
  5. Top smoothie bowl with granola and a little cinnamon if you'd like
  6. Devour smoothie bowl!

It's seriously that simple and SUPER delicious! The nutritional content of this smoothie bowl is also out of this world! The entire bowl is 375 calories with a whopping 33g protein!

Smoothie 1 Nutrition

So next time you are craving a smoothie, try my Mocha-cado Smoothie Bowl! I promise you will not be disappointed :-)

Smoothie Bowl 1
Smoothie Bowl 1